Insanely Addictive Oreo Truffles: Melt-in-Your-Mouth Treats
Prepare yourself for a dessert experience that will redefine your understanding of easy and delicious. We're talking about easy no bake Oreo truffles – those bite-sized wonders that taste like pure joy and disappear faster than you can say "more, please!" If you thought the humble Oreo cookie had reached its peak, think again. These truffles take your favorite cookie to an entirely new dimension of decadence, combining its iconic flavor with a creamy, rich center and a crisp chocolate shell. Perfect for parties, spontaneous cravings, or thoughtful last-minute gifts, these irresistible treats are shockingly simple to make and promise to become your new go-to.
Forget the stress of elaborate baking projects. Our mission today is to arm you with the knowledge to create outrageously delicious, melt-in-your-mouth Oreo truffles with minimal fuss. We’re talking about a mere handful of ingredients, under an hour of your time, and a process so straightforward, even novice cooks will feel like seasoned confectioners. So, let’s dive into the world of these incredibly addictive delights and discover why they’re everyone's favorite (and possibly your absolute weakness!).
The Undeniable Allure of Easy No-Bake Oreo Truffles
What makes these truffles so universally adored and, dare we say, impossible to resist? It boils down to a magical combination of convenience, texture, and pure, unadulterated flavor. Unlike traditional cake truffles, which often involve baking a cake, crumbling it, mixing, rolling, and then coating – a process that can be messy and time-consuming – these easy no bake Oreo truffles streamline everything. They cut out the oven entirely, saving you time, effort, and a whole lot of cleanup.
The texture is a key player here. Imagine a dense, moist, cake-like center that somehow manages to be both rich and delicate, encased in a perfectly crisp, snappy chocolate coating. Each bite offers a delightful contrast that dances on your palate. The base, made from finely crushed Oreo cookies blended with cream cheese, yields a truffle that is surprisingly sophisticated, yet comfortingly familiar. They possess a sweetness that is perfectly balanced, making them satisfying without being cloying. This unique combination ensures that whether you're serving them at a festive gathering or sneaking one from the fridge late at night, they deliver an unparalleled taste experience.
Their versatility also adds to their charm. They’re fancy enough for a holiday dessert spread, yet casual enough for an everyday indulgence. Many describe them as "insanely addictive" – and for good reason! Their small size makes them easy to pop into your mouth, and their delightful flavor profile makes it nearly impossible to stop at just one. It’s no wonder they often disappear from platters long before the party even gets into full swing. Once you try them, you’ll understand why these little wonders are a true game-changer in the world of no-bake desserts.
Unveiling the Simple Secrets: Just a Few Ingredients!
The true genius of these delightful treats lies in their minimalist ingredient list. You don't need a pantry full of exotic items to create something extraordinary. For the foundational easy no bake Oreo truffles, you'll typically only need three or four key components, which are readily available at any grocery store. It's this simplicity that truly elevates them from a mere snack to a culinary triumph.
- Oreo Cookies: This is, of course, the star of the show. While classic dark chocolate Oreos provide that quintessential rich, deep flavor profile, don't shy away from experimenting! Golden Oreos, when crushed and mixed with cream cheese, magically transform into a treat reminiscent of birthday cake – a delightful surprise for any celebration. You can also explore seasonal Oreo flavors like mint or peanut butter for unique twists. The key is to crush them very finely, ensuring a smooth, uniform base for your truffles.
- Cream Cheese: The unsung hero! Full-fat cream cheese is crucial here. It acts as the binder, providing the necessary moisture and richness to transform the cookie crumbs into a pliable, truffle-worthy dough. Make sure your cream cheese is softened to room temperature before mixing. This ensures it blends seamlessly with the crushed Oreos, creating a smooth and lump-free consistency that rolls like a dream.
- Chocolate Coating: This provides the luxurious outer shell and contributes significantly to the melt-in-your-mouth experience. High-quality white candy melts are a popular choice for their smooth melting properties and easy handling. However, you can use a good quality white chocolate, milk chocolate, or even dark chocolate for varying levels of sweetness and intensity. Some recipes also incorporate a touch of coconut oil or shortening into the melted chocolate to achieve a thinner, smoother coating that sets beautifully.
- Optional Flavor Enhancers/Toppings: While technically a three-ingredient wonder, a fourth ingredient can elevate your truffles even further. This could be a splash of vanilla extract, a pinch of peppermint extract for a holiday twist, or a vibrant array of sprinkles for decoration.
The synergy between these basic ingredients is what creates the magic. The creamy tang of the cheese perfectly balances the sweetness of the cookies, and the crisp chocolate shell provides that satisfying snap. For a deeper dive into the minimal components that make this dessert a party favorite, check out our guide on Easy No-Bake Oreo Truffles: The 3-Ingredient Party Dessert.
Crafting Your Perfect Truffles: Step-by-Step Excellence
Making these easy no bake Oreo truffles is incredibly straightforward, but a few key techniques will ensure a flawless, professional-looking result every time. Follow these steps for truffle perfection:
- Crush Your Oreos: The first crucial step is to get those Oreos into a fine, powdery crumb. The easiest way to achieve this is by using a food processor. Simply pulse the cookies (creams and all!) until they resemble fine sand. If you don't have a food processor, place the cookies in a sturdy Ziploc bag, seal it, and crush them with a rolling pin or the bottom of a heavy pan until no large chunks remain. The finer the crumbs, the smoother your truffle mixture will be.
- Combine with Cream Cheese: In a large mixing bowl, add your softened room-temperature cream cheese to the crushed Oreo crumbs. Using a sturdy spoon or a stand mixer with a paddle attachment, mix until the ingredients are thoroughly combined and form a thick, uniform dough. It should be firm enough to hold its shape but still pliable. Avoid overmixing, just enough until it's cohesive.
- Roll into Balls: Now for the fun part! Scoop out small portions of the mixture (about a tablespoon each) and roll them between your palms to form smooth, uniform spheres. Aim for consistency in size for even coating and a polished presentation.
- Chill Thoroughly: This step is non-negotiable for success. Arrange your rolled truffle balls on a parchment-lined baking sheet and place them in the refrigerator for at least 30 minutes, or even better, an hour. Chilling helps the truffles firm up, making them easier to dip and ensuring the chocolate coating adheres beautifully without melting the truffle itself.
- Prepare Your Chocolate Coating: While the truffles are chilling, melt your chosen chocolate or candy melts. You can do this in a microwave-safe bowl in 30-second intervals, stirring well after each, until smooth. Alternatively, use a double boiler for a more controlled melt. If your chocolate seems too thick, add a tiny bit of coconut oil or shortening (about ½ teaspoon per cup of chocolate) to thin it slightly for easier dipping.
- Dip and Coat: This requires a bit of finesse. Using a fork, a dipping tool, or even a toothpick, carefully dip each chilled truffle into the melted chocolate, ensuring it's fully coated. Gently tap the fork against the side of the bowl to remove any excess chocolate.
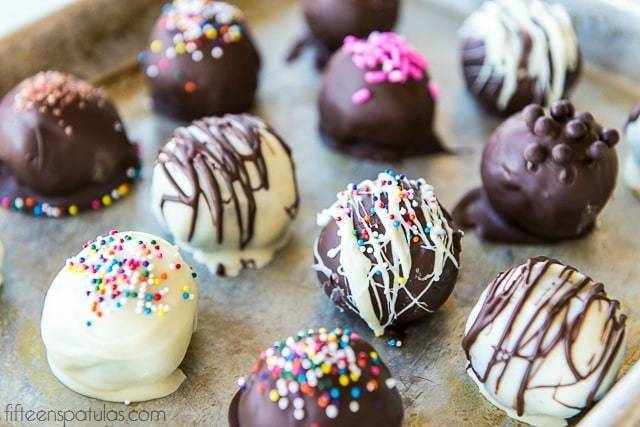
- Decorate and Set: Immediately transfer the coated truffle back to the parchment-lined baking sheet. This is your window for decorating! Sprinkle with your favorite toppings – colorful sprinkles, crushed nuts, sea salt, or a contrasting chocolate drizzle. Once decorated, place the truffles back in the refrigerator to allow the chocolate coating to set completely, typically another 15-20 minutes.
And there you have it! A batch of unbelievably delicious, perfectly coated easy no bake Oreo truffles, ready to impress.
Endless Possibilities: Customizing and Serving Your Oreo Truffles
While the classic easy no bake Oreo truffles are divine on their own, their simple base makes them a fantastic canvas for creative customization. Don't be afraid to experiment and personalize your batch to suit any occasion or palate!
Flavor Variations:
- Mint Chocolate Dream: Add a few drops of peppermint extract to the cream cheese mixture, then dip in dark chocolate for a refreshing twist.
- Orange Zest Zing: Grate some fresh orange zest into the Oreo/cream cheese blend before rolling for a bright, citrusy note.
- Peanut Butter Perfection: Mix in a tablespoon or two of creamy peanut butter with the cream cheese, and dip in milk chocolate.
- Espresso Boost: Add a teaspoon of instant espresso powder to the Oreo crumbs for a subtle coffee kick that enhances the chocolate flavor.
- Seasonal Swaps: Utilize seasonal Oreo flavors like Pumpkin Spice, Red Velvet, or Peppermint Bark Oreos for holiday-specific truffles.
Topping & Coating Ideas:
- Classic Sprinkles: Jimmies, nonpareils, or edible glitter can add a festive pop of color.
- Nutty Crunch: Roll in finely chopped pecans, walnuts, or almonds after coating.
- Coconut Haven: Sprinkle with shredded coconut for a tropical touch.
- Cookie Crumble: Reserve a small portion of crushed Oreos to sprinkle on top for extra texture and visual appeal.
- Elegant Drizzles: After the main chocolate coating sets, drizzle with a contrasting melted chocolate (e.g., dark chocolate drizzle over white chocolate coating) for a sophisticated finish.
- Sea Salt Sparkle: A delicate sprinkle of flaky sea salt on top of dark chocolate coated truffles provides a gourmet sweet-and-salty contrast.
Serving & Gifting Suggestions:
These truffles aren't just for eating; they're also fantastic for presentation and gifting. Arrange them on a beautiful platter in mini cupcake liners for an elegant dessert table. For a fun, interactive treat, insert lollipop sticks into the chilled truffle balls before dipping, transforming them into "Oreo pops" – perfect for kids' parties or holiday gatherings. They also make truly heartfelt, last-minute gifts. Package them in small decorative boxes, cellophane bags tied with a ribbon, or even a simple jar, and you have a thoughtful present that anyone would adore. For more ideas on how these simple treats can make your holidays and gifting effortless, check out our article: Skip the Bake: Easy Oreo Truffles for Holidays & Quick Gifts.
Storage Tip: Oreo truffles are best stored in an airtight container in the refrigerator, where they'll stay fresh for up to a week. Even better, they freeze beautifully! Store them in a freezer-safe container for up to 2-3 months. They're actually quite delicious straight from the freezer, offering a firmer, almost ice cream-like texture – a perfect secret indulgence!
Conclusion
There you have it – the complete guide to creating insanely addictive, melt-in-your-mouth easy no bake Oreo truffles. From their humble three-ingredient beginning to their customizable glory, these treats truly stand out as a testament to the power of simplicity. They offer all the decadence of a gourmet dessert without the fuss, making them the perfect solution for busy hosts, last-minute cravings, or anyone who simply loves a truly delicious, satisfying sweet. So go ahead, gather your ingredients, follow these straightforward steps, and prepare to be utterly charmed by these irresistible bites. Just be warned: once you make them, you might find it impossible to keep your hands off!
